The Master Controls panel is the central dashboard for Filmlight Pro, providing essential, real-time lighting and exposure data derived from all your settings (Ambient, Subject, Camera, Lighting, and Diffusion). This guide explains each function and how it helps cinematographers.

Step 1: Set the Key Light Distance

Module: Key Light Distance
Function: Use the slider or enter a value (in meters or feet) to set the distance between your primary light source and your subject.
Cinematographer’s Benefit: Changing this distance instantly updates the Subject Illuminance and Required Illuminance based on the inverse-square law, allowing you to accurately plan the physical placement of your lights before stepping on set.
Step 2: Apply a Look Template (Optional)

Function: Use the dropdown menu to apply a pre-defined exposure templates like balanced, high contrast, dramatic or none.
- Module: Look Template
- Function: Use the dropdown menu to apply a pre-defined exposure template. (In the image, it is set to “None”).
- Cinematographer’s Benefit: This feature can be used to quickly apply a known exposure shift or look (e.g., setting a standard overexposure/underexposure for a specific film stock simulation).
Step 3: Analyze Exposure Ratios
Module: Subject to Key and Subject to Ambient

Function: These readouts display the dynamic range and contrast of your scene:
- Subject to Key (EV): Shows the difference in exposure value between the key-lit side of your subject and a middle-grey reference. This tells you how bright your key light is. (Example in image: +4.1 EV – Very Over exposes).
- Subject to Ambient (Ratio): Shows the contrast ratio between the key-lit side and the shadow (ambient-lit) side of the subject. (Example in image: 3.7:1).
Cinematographer’s Benefit: The Subject to Ambient ratio is your core contrast value. Filmmakers use this ratio (e.g., 2:1 for flat, 4:1 for dramatic) to ensure the lighting matches the emotional tone of the scene.
Step 4: Monitor Illuminance Values (Lux)
Module: Subject Illuminance and Ambient Illuminance
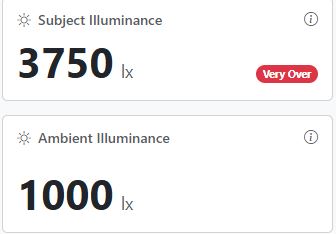
Function: These show the amount of light (in Lux) hitting the scene, calculated from your Fixture and Ambient settings:
- Subject Illuminance (lx): The total light hitting the subject from all light sources. (Example: 3750 lx).
- Ambient Illuminance (lx): The base light level you set in the Ambient panel. (Example: 1000 lx).
Cinematographer’s Benefit: Knowing the actual Lux level allows you to verify if your lighting gear is powerful enough for a given distance and aperture, preventing exposure issues on set.
Step 6: Evaluate Ambient to Key and Required Illuminance
Module: Ambient to Key and Required Illuminance
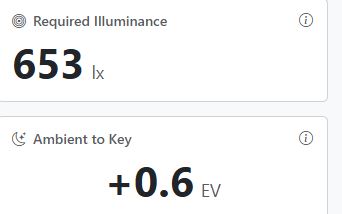
Module: Required Illuminance
Function: This value tells you the exact amount of light (Lux) that is required on the subject to achieve a technically correct exposure, based on your current Camera Settings (ISO, T-stop, Shutter).
Cinematographer’s Benefit: This is a key metric. You compare Required Illuminance (e.g., 214 lx) against Subject Illuminance (e.g., 3750 lx). If Subject Lux is much higher than Required Lux (as in the example), you know you need to reduce light, add diffusion, or stop down the lens.
Function: This readout (in EV) measures the difference between the Ambient light level and the Key light level.
Cinematographer’s Benefit: This helps you understand how much stronger your key light is than the overall environment. A positive EV means the Key is brighter; a negative EV means the Key is weaker than the ambient light, which is critical for naturalistic or high-key lighting styles.


