This guide will show you how to configure your light fixtures and modifiers within the Filmlight Pro application to simulate your on-set lighting setup.
Step 1: Access the Lighting Settings Panel

Click on the Lighting button in the left-hand menu. This will open the Fixture Details panel, where you define the characteristics of your key light.
Step 2: Select the Lighting Fixture

Use the Lighting Fixture dropdown to choose your base light source (e.g., Aputure 1200D Pro, ARRI Orbiter). This selection automatically configures the power and light properties of the unit for accurate calculation.
Step 3: Choose a Lighting Modifier

Select the Lighting Modifier (e.g., Softbox, Beauty Dish, Fresnel). This choice shapes the light and defines its quality.
Step 4: Analyze Light Quality and Beam Diameter
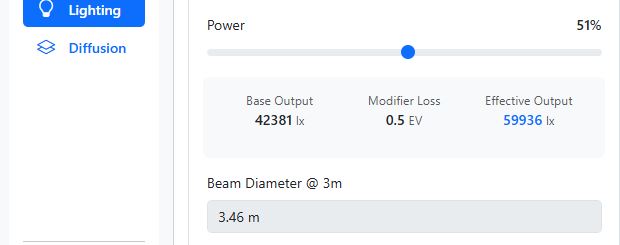
Once a modifier is selected, the application displays its properties:
Light Quality (Hard/Soft):
A label indicates if the modified light is Hard or Soft.
Beam Diameter (∘)
The beam angle is shown (e.g., 60∘), which determines how spread out the light is.
Step 5: Set the Number of Fixtures and Color Gel
Use the Number of Fixtures field to indicate how many identical lights you are using. This multiplies the total light output in the calculation.
Use the Color Gel dropdown to simulate the effect of applying filtration gels (like CTO or CTB) to your light fixture. By default, it is set to None.


