
We’ve all seen the massive gap between a shaky home movie and a polished Netflix original. You likely have a brilliant 4K camera sitting in your pocket right now, yet simply hitting “record” rarely captures that elusive Hollywood magic. According to seasoned directors, the secret isn’t a $50,000 budget or the newest gear brand. Understanding Cinematography Basics is what truly separates amateur footage from professional filmmaking.
Instead, the magic lies in understanding cinematography vs videography. Capturing events exactly as they happen is videography, while shaping those moments to make an audience feel an emotion is cinematography. Professional filmmakers operate with “cinematic intentionality,” meaning they never just point and shoot. Every shadow they cast or angle they choose is deliberately designed to tell a visual story.
Mastering these exact concepts proves that thoughtful lighting and composition will always outshine sheer camera resolution. Welcome to Cinematography Basics: How to Shoot Like a Professional Filmmaker. Learning how to achieve a cinematic look doesn’t require studio funding—it simply demands a new, intentional way of looking through your lens.
Why Better Framing Beats Expensive Gear: Visual Storytelling Through Composition
Even videos shot on the newest smartphones can end up looking like basic home movies if the framing is poor. The secret to fixing this isn’t buying a bigger lens; it’s mastering visual storytelling through composition. Professional filmmakers rely on a straightforward shot hierarchy—moving intentionally between wide, medium, and close-up views. Rather than just standing wherever is most convenient, you must place the camera with absolute purpose to guide the audience’s attention.
Changing your camera angles actually shifts how the viewer feels, a concept known in film production as the emotional weight of framing. Imagine filming a friend sitting at a cafe. A wide shot from across the street makes them look small or isolated in their environment. A medium shot from the waist up feels like a casual, natural conversation. Push in for a tight close-up on their face, and suddenly the audience intimately feels every ounce of their joy or tension.
Beyond selecting the right shot size, you also need to give your subjects space to breathe using “Lead Room.” This simply means leaving empty space in the frame in the exact direction your subject is looking. If they gaze toward the right side of the screen, you place them on the left. Once you understand how these spacing choices impact emotion, positioning your subject optimally on screen becomes your next priority. Strong Cinematography Basics always begin with intentional framing.
Why the Rule of Thirds Isn't Always the Answer: Rule of Thirds vs Golden Ratio
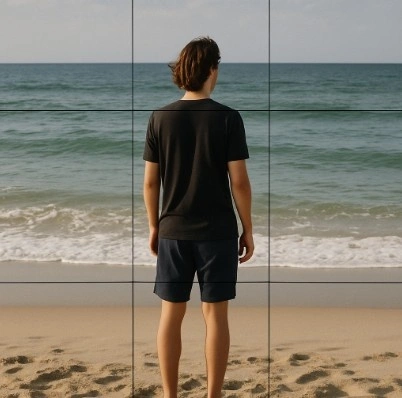
Imagine placing a tic-tac-toe board over your camera screen. This is the Rule of Thirds, a cornerstone of Cinematography Basics where you place your subject exactly where those lines intersect. It instantly balances the frame, curing the amateur habit of always placing everything dead-center.
Yet, mastering composition means knowing when to evolve past rigid grids. The Golden Ratio offers a sophisticated alternative, guiding the viewer’s eye through a sweeping, natural spiral rather than harsh intersections. When comparing the rule of thirds vs golden ratio, consider your scene’s energy:
- Rule of Thirds: Best for action, vast landscapes, or standard interviews needing quick, reliable balance.
- Golden Ratio: Ideal for natural portraits or artistic stills craving an organically perfect feel.
Sometimes, the boldest choice is throwing out the math entirely. “Center-punching” intentionally breaks these rules by placing your subject perfectly in the middle, creating intense, stylized symmetry. Once you know exactly where to place your subject for maximum visual impact, you must ensure viewers feel the right emotion when looking at them. Light is the ultimate tool to establish this mood.
How Light Tells the Story: Moving from 'Visible' to 'Moody' with Three-Point Lighting
You know your camera sensor needs light to capture an image, but mastering Cinematography Basics means learning to intentionally shape that illumination. To get the rich depth seen in blockbuster movies, start with your primary source, the Key Light. Instead of pointing it straight at your subject’s face—which creates a flat, driver’s-license look—place it at a 45-degree angle. This creates natural, flattering shadows across their features, instantly establishing a cinematic mood rather than just making them visible.
Leaving those shadows pure black introduces a serious challenge with dynamic range and exposure control. Dynamic range is simply your camera’s ability to see details in both the brightest and darkest areas at the same time. If the contrast is too extreme, you risk “blowing out” the lit side into an ugly white blob just to make the shadowed side visible. You can fix this by adding a Fill Light on the unlit side of the face, gently lifting the darkness without overpowering your primary key.
Completing this classic three-point lighting setup requires physically separating your subject from their environment. By placing a Backlight behind your actor, pointing toward the back of their head or shoulders, you create a subtle glowing edge. This crisp halo detaches them from dark backgrounds so they visually pop off the screen. You can successfully replicate this dimensional lighting without expensive gear by mastering the sun.
Using Natural Light for Filmmaking When You Have Zero Budget
Stepping outside at noon reveals harsh, overhead sun creating unflattering raccoon shadows under your actor’s eyes. That “hard light” makes figuring out how to achieve a cinematic look incredibly difficult. The secret to using natural light for filmmaking is simply timing. Film during “Golden Hour”—the short window just after sunrise or right before sunset. The low sun acts as a giant, flattering “soft light,” wrapping gently around faces to create a warm, professional vibe without spending a dime on gear.
Moving indoors doesn’t require a heavy studio setup either. A standard window acts like a massive softbox used in high-end film production. Place your actor near the glass at that 45-degree angle we just learned. If the shadowed side of their face gets too dark, grab a cheap white poster board. Holding this board just out of frame lets you catch the window light and “bounce” it back onto the shadows, creating a completely free fill light.
To ensure your scene looks intentional, run through this quick checklist:
- Timing: Shoot during Golden Hour to avoid harsh midday shadows.
- Modifiers: Keep a white board handy to bounce light.
- Placement: Position subjects near large windows for soft indoor illumination.
Once you master shaping the sun, your next challenge is capturing it properly through your camera’s internal exposure settings.
Mastering the Exposure Triangle: Manual Camera Settings for Video
Capturing that beautiful window light requires taking control. Think of the Exposure Triangle—a foundation of Cinematography Basics—like baking. To get a perfectly exposed image without “burning” it into pure white, you must balance three ingredients: how wide the lens opens, your sensor’s sensitivity, and how long light hits that sensor.
That soft, blurry background seen in blockbuster movies comes from your first ingredient: Aperture. This setting controls the physical opening in your lens. Prioritize a wide aperture when you want that cinematic, isolated look. Opening this “window” wider lets in incredible amounts of light, forcing you to adjust elsewhere.
Balancing that light means tweaking your ISO, the setting governing your camera’s artificial sensitivity. While cranking ISO makes dark rooms visible, pushing it too high introduces digital noise—an ugly grain that ruins footage. Mastering these manual camera settings for video ensures a clean image with excellent dynamic range and exposure control. If clouds unexpectedly darken your perfectly balanced scene, tweaking your camera’s “Exposure Compensation” dial provides a quick brightness fix.
The final ingredient in this exposure recipe is Shutter Speed, which dictates how long your camera “blinks.” Unlike photography where a fast shutter simply freezes action, video plays by different rules. Adjusting this time drastically changes how natural movement feels, which directly influences how realistic your final footage appears.
Why Your Motion Looks 'Off': Frame Rate vs Shutter Speed and the 180-Degree Rule
Ever wondered why a blockbuster feels cinematic, but your footage looks like a cheap daytime TV broadcast? This jarring visual difference—often called the “Soap Opera Effect”—comes down to mastering frame rate vs shutter speed. Frame rate dictates how many individual pictures your camera captures per second. For that traditional film look, choose 24 frames per second (fps). If you plan to slow things down later for smooth slow motion, select 60fps.
Connecting those frames seamlessly requires a specific shutter open time, introducing the 180-degree rule. In plain English, this standard dictates your shutter speed should always be double your frame rate. This math guarantees the perfect amount of natural motion blur, mimicking exactly how human eyes see movement. Here is your instant calculation guide:
| Frame Rate | Ideal Shutter Speed | Best Use | | :— | :— | :— | | 24 fps | 1/48 (or 1/50) | Classic Cinematic Look | | 30 fps | 1/60 | Standard Online Video | | 60 fps | 1/120 | Crisp Slow Motion |
Ignoring this rule instantly ruins the illusion of reality. If you use an ultra-fast shutter in bright daylight simply to avoid overexposing the sky, a person’s moving hands will look incredibly choppy and robotic. By locking in these manual camera settings for video, your motion remains fluid and organic. With movement properly calibrated, you can focus on isolating your subject from distracting environments.
How to Control Depth of Field to Isolate Your Subject
You have likely noticed that distinct cinematic look where your subject is incredibly crisp while the background melts away into soft shapes. This relies on controlling depth of field—simply deciding how much of your scene stays sharp from front to back. To create this pleasing background blur, professionally known as bokeh, you need to open your camera’s aperture. By dialing in a low f-number (like f/2.8), you instantly isolate your subject from a messy or distracting environment.
Finding the perfect balance takes practice with your focal plane. Think of this concept as an invisible pane of glass parallel to your camera; whatever touches it is in focus. If you open your aperture too far, that pane becomes incredibly thin. Suddenly, your actor’s eyes are sharp, but their nose is slightly out of focus. Closing the aperture just a fraction reveals the lens’s “sweet spot,” keeping your entire subject flawlessly crisp while maintaining the separation.
Mastering Cinematography Basics requires realizing that maximum blur isn’t always the best storytelling tool. A completely obliterated background removes important environmental context your audience might need to understand the scene. Knowing when to reveal the room is just as crucial as knowing how to hide it. As you conquer focus isolation, the physical shape of that blur becomes your next creative choice.

Choosing the Best Camera Lens: Anamorphic vs Spherical Lenses
That background blur changes shape depending on your glass, making lens selection a vital creative step. Most standard lenses are spherical, capturing the world naturally with perfectly round background blurs. However, big-budget movies often use anamorphic lenses, which physically squeeze a wider image onto the camera sensor. When weighing anamorphic vs spherical lenses, anamorphic glass delivers those iconic horizontal light flares and stretched, oval-shaped blurs that instantly make a shot feel like a Hollywood blockbuster.
Beyond the shape of the glass, choosing a “prime” over a “zoom” can dramatically elevate your film production value. While zoom lenses offer convenience, professionals frequently favor prime lenses, which are locked to a single, fixed focal length. Without complex internal zooming mechanics, primes let in significantly more light and produce noticeably sharper images. You can even experiment with vintage primes, which introduce slight visual imperfections and warm textures that make crisp digital footage feel less artificial and far more organic.
Selecting the right focal length ultimately dictates the emotional weight of your scene. A wide lens expands the room to feel epic or overwhelming, whereas a long lens compresses the space for tight, intimate moments between characters. Once you pick the perfect glass to establish your environment, your next challenge involves filming from different angles without disorienting the viewer.
Stopping the Spatial Whiplash: The 180-Degree Rule for Spatial Orientation
Ever watch a dialogue scene and suddenly feel completely lost about who is standing where? That spatial whiplash is exactly why understanding the 180-degree rule is crucial for any aspiring filmmaker. Imagine drawing a perfectly straight line on the floor directly between your two actors. To keep your audience oriented, your camera must stay on just one side of that imaginary boundary.
Sticking to this invisible semi-circle guarantees that your characters’ eye-lines match up seamlessly when you edit the clips together. If your hero looks to the right side of the screen to talk, the second character must look left to reply. By mastering these specific camera angles, you ensure subjects genuinely connect rather than awkwardly stare past one another. This geometric consistency is the absolute backbone of visual storytelling through composition, safely anchoring the viewer in your carefully constructed scene.
The only time professionals purposely cross this boundary is when they want the audience to feel intensely confused or panicked. A sudden jump across the line creates instant psychological chaos during a frantic fight sequence or a shocking plot twist. Once you lock down where your spatial boundaries are, the next step is adding life to the frame through dynamic motion.
Why Professional Cameras Never Stay Still: Camera Movement Techniques
Next time you watch a movie, notice how the camera rarely stays perfectly still. That subtle breathing motion or deliberate slide is one of the most vital camera movement techniques separating blockbuster hits from amateur home movies. The secret isn’t moving just to move; it’s about “motivated movement.” This means every shift happens for a reason, usually following an actor’s action or shifting the viewer’s focus. Mastering this intention lets you rock a handheld camera to create raw, documentary-style tension without making your audience seasick.
Adding physical motion also unlocks the “parallax effect.” Think of staring out a moving car window: close objects blur past quickly while distant mountains barely shift. This optical illusion instantly creates 3D depth inside a flat, 2D frame. To harness this depth and learn how to achieve a cinematic look, start with these four foundational movements:
- Pan: Turning the camera left or right to reveal hidden, crucial information.
- Tilt: Pointing the lens up or down to emphasize a character’s dominance or scale.
- Dolly-in: Pushing the camera physically closer to a subject to signal a sudden realization.
- Tracking: Moving alongside your subject so the viewer feels like part of the journey.
Once you combine these dynamic Cinematography Basics with solid composition, your footage will finally feel intentional and alive. The camera acts as an active participant in your story rather than a passive observer. With framing and movement locked in, the last step is manipulating mood through post-production.
The Professional's Final Touch: Introduction to Color Grading Techniques
Ever dumped footage onto a computer and found the colors surprisingly dull? That flat appearance is intentional in professional film production. High-end cameras shoot in “Log Profiles”—a setting capturing a flat, low-contrast image to preserve lighting details, leaving you with a blank digital canvas. Transforming that canvas takes two distinct steps: correction and grading. Color correction is the necessary fixing phase, simply ensuring a white shirt actually looks perfectly white. Once your baseline is fixed, you move to color grading, which is the creative styling phase.
Think of grading as emotional paint. Lowering saturation and boosting contrast creates a gritty, tense mood, while warm, vibrant colors feel lighthearted and nostalgic. One of the most reliable color grading techniques is the “teal and orange” look used in major blockbusters. Since human skin naturally falls in the orange spectrum, pushing cool teal into the darker background shadows creates striking visual contrast, making your actors instantly pop off the screen. To shortcut this process, editors often use LUTs (Look-Up Tables)—powerful presets acting like advanced photo filters to apply these complex color formulas instantly.
These final adjustments do more than make individual shots pretty; they unify your entire project. Stitching together clips filmed in different locations can feel disjointed, but washing them in a consistent color palette binds everything into one cohesive story. Mastering how to achieve a cinematic look in post-production guarantees your viewers stay fully immersed.
Your First Cinematic Masterpiece: A 5-Step Action Plan for Your Next Shoot
You are no longer just pressing record and hoping for the best. By understanding these concepts, you have transformed from a passive observer into an intentional visual storyteller. Remember, the best camera is the one you already have in your hands; expensive gear can never replace a sharp eye.
To defeat “analysis paralysis,” rely on a repeatable workflow for every shoot. In film production, professionals always prioritize story and lighting over technical perfection. Before you capture a single frame, run through this Pre-Shoot Checklist:
- Lighting: Where is the light coming from, and does it create the right mood?
- Composition: Am I using the Rule of Thirds or Golden Ratio to naturally guide the viewer’s eye?
- Exposure: Is the image balanced to avoid blinding highlights and crushed shadows?
Commit to a simple practice project right now: Shoot a 30-second scene today using only one window and a phone. Do not worry about equipment; just place your subject near the soft window light, find a compelling angle, and hit record.
Starting with this simple action will immediately build your confidence and cement your skills. As you practice, you will start recognizing the intentional visual choices hiding in plain sight in the media you consume. Trust your new perspective, step behind the lens, and start capturing the world like a filmmaker. Mastering Cinematography Basics takes practice, consistency, and creative intention.
Master Cinematography Basics with Studiovity
Learning Cinematography Basics becomes much easier when your creative tools stay organized in one place. Studiovity helps filmmakers turn cinematic ideas into structured productions with screenplay writing, AI-powered script breakdowns, shot lists, storyboards, scheduling, call sheets, and production planning tools. Whether you are experimenting with lighting, camera movement, composition, or visual storytelling, Studiovity gives directors, cinematographers, and production teams a complete platform to plan every shot with professional precision on web and mobile.