
Have you ever wondered why a horror movie makes your heart race before the monster even steps into the frame? It isn’t just the spooky music causing that anxiety—it is the deliberate way the shots are stitched together to manipulate your pulse. Cinematic storytelling relies heavily on this subtle trickery, widely known as “the invisible art” among industry professionals. While actors provide the emotion and directors capture the action, the editor acts as the secret brain behind the operation, orchestrating exactly what you feel and when you feel it.
To help you master this craft, Film Editing Basics are utilized by industry professionals to transform chaotic, raw footage into structured, emotional narratives. Creating this kind of magic might seem out of reach, but the underlying principles apply to everything from cinematic blockbusters to your own smartphone camera roll.
Perhaps you have recorded a fantastic family vacation or a clever social media clip, only to watch it back and realize something feels distinctly sluggish or “off.” According to a famous filmmaking adage popularized by directors like George Lucas, a movie is actually made three times: when it is written, when it is shot, and when it is edited. Grasping these foundational techniques solves that sluggish feeling by teaching you how to organize a chaotic pile of raw footage into an engaging experience.
Raw video clips are essentially unprepared ingredients waiting for a chef. As the editor, you take on that role, deciding the exact portions, heat, and timing required to serve up a satisfying narrative flow. Because of this ultimate control over the story’s rhythm and emotional outcome, the editing process is frequently called “the final rewrite” of any project. Therefore, studying Film Editing Basics is essential because you are no longer just cutting out the bad parts or trimming awkward pauses; you are actively deciding how the audience will interpret the scene.
Mastering this psychological mindset transforms you from a passive viewer into an informed creator. Soon, you will recognize why a sudden visual change creates comedy, or why holding a shot for three extra seconds builds unbearable tension. Consequently, applying these storytelling techniques provides the practical knowledge needed to shape emotion effectively, proving that you do not need expensive software to keep your audience leaning in.
The 'Invisible Art': Why the Best Film Editing Goes Unnoticed
Think of your raw video clips like bags of groceries brought home from the market. A master chef doesn’t just dump every raw ingredient onto a plate and call it dinner; they carefully chop, heat, and combine specific portions to create a satisfying meal. Learning to edit works exactly the same way. The editor decides which pieces of footage to use and how to present them so the final video actually makes sense. Furthermore, implementing core Film Editing Basics allows you to hide the seams of your work completely.
When this selection process is executed perfectly, viewers won’t even notice the cuts happening on screen. Excellent editing techniques keep the audience completely immersed in the storytelling, guiding their emotions without ever drawing attention to the software or the person behind the screen. If someone notices an awkward pause or a jarring jump, the magical illusion instantly breaks.
Leaving beautiful footage on the cutting room floor is usually the hardest lesson for enthusiastic beginners to accept.
Just because you filmed an amazing ten-second sunset doesn’t mean it belongs in your fast-paced travel vlog. Restraint is what transforms a random collection of clips into a polished, professional experience. To start building this seamless, invisible flow in your own projects, you need to master the standard cut by thinking like a human blink.

Master the Standard Cut by Thinking Like a Human Blink
Notice how your eyes naturally blink when shifting focus from a speaker to a suddenly opening door? In film editing, this everyday reflex perfectly models your fundamental tool: the cut. An edit is an instant visual shift from one clip to the next, acting exactly like that human blink. If a shot holds too long, the video drags; if it switches randomly, viewers feel disoriented. Understanding these natural visual rhythms is a core pillar of Film Editing Basics.
To keep this rhythm natural, every transition must be a “motivated cut”—meaning there is a clear, psychological reason to change the angle. You should never switch perspectives just because you have extra footage. Instead, wait for cues that demand a new viewpoint. You know it’s time to slice your clip when you spot one of these three triggers:
A character looks directly at something off-screen.
The emotional focus shifts to someone’s reaction.
A physical action, like grabbing a coffee cup, completes.
Mastering this “Blink Rule” is among the most effective habits for any creator. Aligning your edits with natural attention shifts ensures the audience never questions the visual jump in time or space. However, when the scene is just a continuous conversation, basic interviews can easily feel like a rigid ping-pong match. To prevent this, you need to utilize smooth dialogue transitions.
Smooth Dialogue Transitions: How J-Cuts and L-Cuts Hide Your Edits
We’ve all watched an interview that felt painfully stiff, bouncing back and forth mechanically. This happens when an editor cuts exactly as one person starts speaking, and cuts back the millisecond the other replies. Industry pros call this exhausting mistake “tennis match” editing. To fix it, you must stagger your audio and video tracks. Therefore, learning how to blend audio tracks is another essential part of Film Editing Basics. Understanding the impact of J-cuts and L-cuts on dialogue is the secret to making conversations feel like a natural, flowing river rather than a rigid traffic jam.
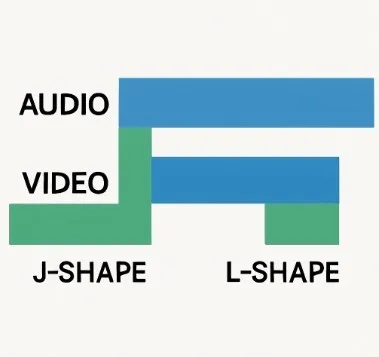
To master these essential techniques, just look at how your clips overlap. A J-cut happens when you hear the audio of the next clip before you see the video, sweeping the viewer smoothly into the next shot. An L-cut is the opposite: the video changes to show a listener’s reaction, but the original speaker’s audio continues playing underneath.
Applying this trick takes only a few clicks. To create a basic L-cut in your software:
- Place your two video clips side-by-side on the timeline.
- Unlink the audio track from the video on the first clip.
- Drag the end of that first audio track so it spills slightly under the second video clip.
By letting sound overlap the image, you subtly manipulate how the audience feels about a conversation. But combining completely unrelated images introduces an entirely new psychological layer.
The Kuleshov Effect: How to Make '1 + 1 = 3' in Your Viewer's Mind
Wonder how an editor can completely change a story without shooting a single frame of new video? While audio overlaps smooth out conversations, the real magic of filmmaking happens when you place two completely unrelated visual clips side-by-side. In editing, one plus one equals three. True meaning doesn’t live inside a single clip; it is born in the invisible gap between your shots. As you study Film Editing Basics, you quickly realize that context is everything.
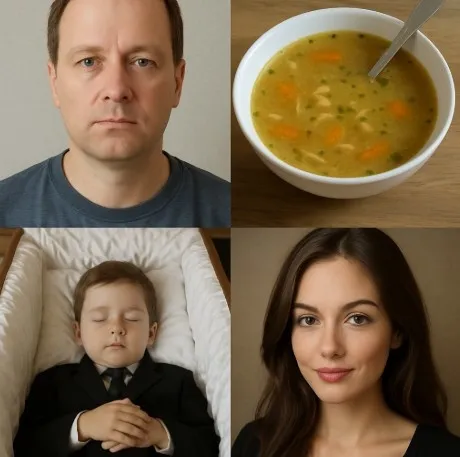
This psychological phenomenon is the Kuleshov Effect, proving that viewers project their own emotions onto images based entirely on sequence. A 1910s filmmaker demonstrated this by showing audiences an actor’s blank face, followed immediately by a bowl of soup. Viewers praised the actor’s subtle portrayal of deep hunger. When that exact same blank expression was paired with a coffin, they saw profound sadness. By simply swapping the second ingredient in this visual recipe, the viewer’s brain instantly invented a completely different story.
Using this technique builds incredible emotional resonance through montage, turning basic videos into compelling narratives. You can apply this immediately to improve your narrative flow: show someone looking off-screen, cut to a ticking clock, and you instantly create anxiety. However, choosing what to show is only half the battle. Deciding how long to hold those shots dictates the viewer’s heartbeat.
Control the Pulse: How to Fix Pacing and Shape Your Narrative Flow
A great action sequence feels exactly like a fast-beating heart. The secret to narrative flow isn’t just what you show, but how long you show it. Think of pacing as the literal pulse of your video. Rapid cuts act like adrenaline, mirroring a character’s chaotic emotional state during a tense moment. Conversely, holding a single, long take acts like a deep, calm breath. If you want to fix pacing in video, start by asking yourself how fast you want your viewer’s chest to rise and fall.
Balancing this rhythm is crucial to prevent viewer fatigue. If every shot is a rapid-fire cut, audiences get exhausted; if moments drag with no purpose, they click away. When practicing Film Editing Basics, use this pacing cheat sheet for essential guidance:
Speed up by slicing out the “dead air” (those awkward, silent pauses before someone speaks) to build instant urgency.
Slow down by letting a shot linger right after a big revelation, giving the viewer’s brain time to process the emotional weight.
Find rhythm by timing your edits to land naturally on the beat of your background music.
Intentionally managing these visual tempos makes you the conductor of your audience’s attention. However, moving quickly between different angles introduces a new danger: confusing your viewer. When you chop up footage to accelerate the pace, you risk creating unnatural visual hiccups that destroy the cinematic illusion. To keep your dynamic timeline feeling seamless, you must establish strict visual continuity.
Continuity Editing: Stop Breaking the Spell with Jarring Jump Cuts
Imagine watching a vlog where a coffee cup magically teleports between the subject’s hands mid-sentence. That visual glitch breaks the spell, highlighting why learning continuity principles is essential. Continuity simply means keeping time, space, and logic consistent so your viewer stays immersed. Therefore, maintaining spatial awareness is a vital rule within Film Editing Basics.
The best trick for avoiding jarring jump cuts is “matching action.” If you cut from a medium shot to a close-up right in the middle of someone opening a door, the physical movement acts as camouflage, effectively hiding the cut from the viewer’s brain.
Spatial consistency relies heavily on a few invisible boundaries. The 180-degree rule requires drawing an imaginary line between two interacting subjects and keeping all camera angles on one side of it, ensuring characters always appear to look at each other. Furthermore, the 30-degree rule dictates that new camera angles of the exact same subject must shift by at least 30 degrees, otherwise the edit will look like an unintentional skip. Apply these checks to verify a seamless transition:
Check the sightlines: Are your subjects looking in the correct, opposing directions?
Track the props: Are hands, items, and posture exactly where they were a fraction of a second ago?
Hide the cut: Did you slice the clips right in the middle of a physical motion?
Mastering these spatial guidelines guarantees your audience won’t get dizzy or confused by your creative choices. Before you can effortlessly stitch together these matched actions, however, you need to know exactly where to find your best clips.
Organize to Create: A Step-by-Step Non-Destructive Workflow
One of the biggest fears for new creators is accidentally deleting the perfect take. Fortunately, mastering modern software means learning a reassuring secret: editors use a non-destructive workflow. This simply means your app never permanently alters or deletes the original files on your hard drive. When you “cut” a clip on your timeline, you are just telling the computer which part of the file to look at—much like highlighting a sentence in a textbook without ripping out the page.
Before importing those safe files, however, you must set the table properly. Imagine trying to cook a meal with ingredients scattered randomly across your house; that is exactly what editing feels like without proper file organization. A reliable post-production workflow is heavily emphasized in Film Editing Basics, starting directly on your computer desktop by creating a main project folder containing these four specific subfolders:
Footage: All raw video clips from your camera or phone.
Audio: Music tracks, sound effects, and voiceovers.
Graphics: Logos, text overlays, or still images.
Exports: The final, finished videos you plan to share.
Grouping your assets this way drastically reduces technical stress once the real work begins. Your software will easily track down every file, preventing those frustrating “media missing” errors that derail your creative momentum. With your ingredients perfectly prepped and safely stored, you are finally ready to start the assembly.
The Assembly Cut vs. Rough Cut: Why Your First Version Should Be 'Bad'
Staring at a blank timeline is intimidating, but proper editing means giving yourself permission to make a mess. Your first step is pulling “Selects.” Instead of demanding flawless technical quality, hunt for genuine emotion and strong performances. If your subject stumbles but delivers a heartfelt smile, keep it. You are simply gathering your best raw ingredients.
Once those favorite moments are chosen, you drop them onto the timeline in story order to build your Assembly Cut. This version will look incredibly clunky, and that is exactly the point. The goal is strictly to see if the narrative makes sense from beginning to end, without stressing over smooth transitions. This structural progression is standard for anyone learning Film Editing Basics. Think of it as writing a sloppy first draft; you cannot refine the pacing until a basic structural foundation exists.
Sculpting that bulky foundation into a watchable video highlights the main difference between these phases. While the assembly is a chronological dumping ground, the rough cut is where you start trimming the fat, tightening pauses, and finding the true heartbeat of the scene. You begin actively shaping audience emotion by deciding exactly when to cut away. Often, you will realize the most powerful choice isn’t showing the person speaking—a realization that makes reaction shots so crucial.
Visual Storytelling: Using Reaction Shots to Build Emotional Resonance
The real payoff of a joke isn’t the punchline—it is watching your friend’s face light up with laughter. This illustrates why mastering visual storytelling with reaction shots is a secret weapon. Beginners usually bounce the camera exclusively to whoever is speaking. However, the true weight of a scene often lives in the silence of the listener, transforming a basic video into a compelling narrative by showing us exactly how to feel.
Beyond pure emotion, these cutaways serve as practical tools to solve common everyday editing nightmares. Imagine your interview subject says “um” right in the middle of a brilliant thought. Instead of leaving a jarring visual jump, you can seamlessly stitch the best audio together and cover the video gap with B-roll—supplementary footage that sets the scene, like a close-up of hands gesturing.
“This technique neatly hides your technical mistakes while naturally enforcing the golden rule to “show, don’t tell.”
Layering these silent reactions with atmospheric footage builds deep emotional resonance through montage rather than relying solely on dialogue. Thus, understanding visual subtext expands your command of Film Editing Basics. You are no longer just trimming clips; you are actively manipulating time to guide the viewer’s heart. Once these visual elements are polished and the emotional pacing feels natural, you will be prepared for reaching picture lock.
Reaching Picture Lock: How to Correct Narrative Inconsistencies
Watching a video and suddenly wondering, “Wait, how did they get there?” instantly breaks viewer immersion. That jarring confusion is exactly what you must avoid. Before adding final music or titles, you need to reach a crucial milestone: Picture Lock. This simply means your visual arrangement is completely finalized—no more video clips will be shifted or removed. Reaching this stage requires watching your timeline strictly to correct narrative inconsistencies, ensuring every shot logically connects so your audience never feels lost.
Sometimes, achieving this smooth flow means facing a hard truth: a beautiful shot might actually ruin the story. You might have spent hours capturing a stunning sunset, but if it drags down your pacing, it has to go. This is a core rule known as “killing your darlings.” If a scene isn’t actively moving the plot forward or revealing genuine emotion, you must delete it, regardless of your personal attachment to the footage. Consequently, maintaining discipline at this stage is a mark of true proficiency in Film Editing Basics.
Taking that final step requires watching your project through the eyes of a first-time viewer. Run through this final checklist before declaring your project locked:
Does the opening clearly establish the video’s purpose?
Are there any confusing jumps in time or location?
Are all “darling” shots actually serving the overall story?
Once your visual foundation is completely locked, you are ready to apply your editor’s toolkit.
Your Editor's Toolkit: A 3-Step Plan to Cut and Shape Your Story Today
By mastering these fundamental techniques, you transition from a passive viewer to an intentional creator. Every cut becomes a purposeful blink, guiding your audience’s eyes and shaping their emotional journey. With a solid foundation in Film Editing Basics, you now have the power to control the heartbeat of the screen.
To apply this perspective, approach your next project using a simple three-step method:
Organize: Sort your raw footage completely so you know exactly what media you have available before you open your software.
Assemble: Build your core narrative by placing clips on your timeline, focusing entirely on the sequence of events rather than immediate visual perfection.
Refine: Trim away dull moments, tighten the pacing, and use overlaps like J-cuts and L-cuts to build tension or invite calm.
By experimenting with these core techniques, you will quickly discover how shifting a single clip can entirely change the mood of a scene. Try applying this straightforward workflow to your next video project, whether it is a travel vlog or a family memory, and watch your footage come alive. Every cinematic masterpiece you have ever loved began the exact same way: with one simple cut.
Bring Your Story to Life with Studiovity
Mastering the fundamentals of editing is only half the battle; having the right tools to map out your vision is what truly elevates a project. This is where Studiovity becomes an editor’s greatest asset. Long before you drop your first clip onto a timeline or make that crucial first cut, Studiovity’s all-in-one pre-production and production management platform allows you to plan your narrative structure seamlessly. By using its intuitive scriptwriting tools, dynamic storyboarding, and detailed shot lists, you can map out your J-cuts, visual pacing, and continuity checks during the writing phase.
Planning your project with Studiovity ensures that your “final rewrite” in the editing room is a smooth, creative experience rather than a chaotic rescue mission. Ready to transform your raw footage into a compelling cinematic narrative? Sign up for Studiovity today and start shaping your stories with absolute precision.